Extend a LVM btrfs partition

Recently I had the issue, that my root partition (/ or slash) was a bit too small for some update. So I had to look up how to resize the root partition. Luckily with LVM/btrfs this works like a charm (if you added enough free space):


Windows *: mscorsvw.exe high CPU usage

Another .NET update later, an hour spent looking this up. Why is mscorsvw.exe using 25% CPU for >30 minutes?

Here’s a short outliner on how to speed it up:

The scripts we’ve provided are a convenience for people who don’t want to deal with a command prompt. If you prefer to use the command prompt, you can use the commands below instead. These commands depend on the version of the .NET Framework you have installed and the version of Windows that you have and whether it’s 32-bit or 64-bit.

  • .NET 4, 4.5, or 4.5.1 Preview on Windows 7 or earlier:c:\Windows\Microsoft.NET\Framework\v4.0.30319\ngen.exe executeQueuedItems

    On a 64-bit operating system, add:

    c:\Windows\Microsoft.NET\Framework64\v4.0.30319\ngen.exe executeQueuedItems

  • .NET 4, 4.5, or 4.5.1 Preview on Windows 8 or 8.1 Preview:c:\Windows\Microsoft.NET\Framework\v4.0.30319\ngen.exe executeQueuedItems
    schTasks /run /Tn “\Microsoft\Windows\.NET Framework\.NET Framework NGEN v4.0.30319”

    On a 64-bit operating system, add:

    c:\Windows\Microsoft.NET\Framework64\v4.0.30319\ngen.exe executeQueuedItems
    schTasks /run /Tn “\Microsoft\Windows\.NET Framework\.NET Framework NGEN v4.0.30319 64”

  • If you don’t have .NET 4 or later installed, but you do have .NET 2.0 or 3.5, use this command instead:c:\Windows\Microsoft.NET\Framework\v2.0.50727\ngen.exe executeQueuedItems

    On a 64-bit operating system, add:

    c:\Windows\Microsoft.NET\Framework64\v2.0.50727\ngen.exe executeQueuedItems

These commands assume that Windows is installed on the C drive. If that’s not the case, you can change the drive letter, or use the %windir% environment variable (ex: %windir%\Microsoft.NET\Framework\v4.0.30319\ngen.exe executeQueuedItems)

foobar2000 File Operations Setup

As I said in the previous posts, I’ve reorganized my music library. That included creating sub directories based on the first letter of the artists name (say for example AC/DC would be sorted into the folder A, Iron Maiden would be sorted into I).

So here’s the file name pattern, that I’ve used to accomplish this:


PowerCLI: Delete all snapshots by name

I have the issue that we use a cloud automation software, which for whatever reason failed to delete the hypervisor snapshots.

Now I was looking into a quick way to delete all those 520 snapshots with PowerCLI, and I found something pretty quick.


Based on that, I came up with my own quick PowerCLI one-liner, that’ll list all VMs and their snapshots:

Now, I could use another one-liner to delete all snapshots, that’ll look like this:

However, this will either crash an ESXi host (because the amount of the snapshots is too much) or overwealm the storage. So in the end I used a script like this:

This’ll limit the maximum amount of snapshots to delete at times to 5 (or 10 if you change the $maxtasks value).

Quick-Add a bunch of Virtual Machine Port-Groups from CSV

Well, I’m currently migrating between different cluster layouts, and I had to create the new PortGroups on the old hosts, in order for me to switch between old and new hosts.


And the corresponding CSV would look like this:


ViMbAdmin and mod_rewrite

Well, I use ViMbAdmin for the mail box administration of my users (and aliases) on heimdaheim.de. After I while (well, over half a year I guess), I decided to look at it again. However it didn’t work. Well this was a multi-part problem.

  1. ViMbAdmin has been updated to require PHP composer (which populates the vendor/ folder)
  2. the application.ini was outdated

After I fixed all that, ViMbAdmin was working again. However I decided to replace my mod_rewrite stuff (I had in my apache config from the previous version) with the one from the Documentation and that actually made things worse. So I ended up *redigging* into mod_rewrite (again *sigh*) and rewrite the Rewrite Rules… This time I’m documenting it.

Keep in mind, this is part of my apache config, not a .htaccess file.

Adjust album list display in foobar2000

Well, as I said earlier I’ve been playing around with my Sonos (and in that regard cleaning up my music library). Now, I started setting up my foobar2000 to ignore articles (The, A) when moving/copying file to my music library.

For example, previously the structure would have looked like this:

Now, after implementing the file operations adjustments (I’ll post them later), the structure looks like this:

However the Album View will display the album artist as it’s presented in the MP3’s %album% tag. So, I needed to modify the Album List’s view. For that repeat these steps:

  1. Goto Preferences (Ctrl+P or File->Preferences)
  2. Extend the Media Library node
  3. Switch to Album List

I wanted to adjust the “by artist/album” view (since I only use that). The default code for that is as follows:

As with everything in foobar2000, that is configurable and uses the Title Formatting. After a short peek into the Foobar2000 forum, I found what I was looking for.


Display MusicBrainz info in foobar2000

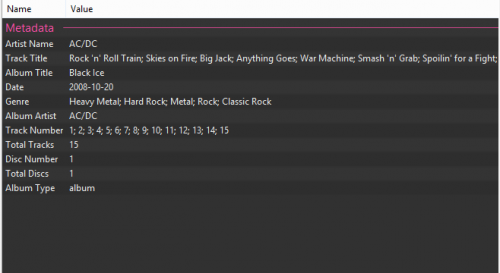
I’ve been cleaning up my music library the past few days (well, I bought a Sonos :D), so here’s how you display for example the tagging field MUSICBRAINZ ALBUM TYPE in foobar2000’s default metadata view.


  1. Goto preferences (Ctrl+P or File->Preferences)
  2. Navigate to Advanced
  3. Extend the Display node, extend Properties Dialoge node
  4. There you’ll find the option for Standard fields
  5. Change it to the following:

After changing the Standard fields option, the metadata view will look like this:

foobar2000-metadata-view

OpenELEC on CuBox i – Update to latest snapshot

Here’s an easy way to update the OpenELEC running on a CuBox-i easily:


PowerShell – and how to add new DNS servers to remote systems

Well, I’ve been playing around with PowerShell today. I had the task to move (as in change the IP address) two domain controllers into another VLAN. I could have done it the easy way and added the DNS servers by hand (by RDP’ing to each system having these particular DNS servers configured) – which wouldn’t have been very hard considering the domain only has 7 members at this point …

I wanted to do it the proper way, so I ended up asking old uncle Google, and it supplied me with the answers I was looking for.

Now, I executed those few PowerShell lines before changing the IP address of both domain controllers (10.76.15.20 being the old IP and 10.76.20.20 being the new one). After that I changed the IP address on the second (and after a short downtime) on the first domain controller. After both were restored and available again (and I checked with repadmin /showrepl), I ran the script again, this time only setting the new DCs:

Well, considering the time I spent on looking for this and the time I would have needed to change even the seven members – even this is a time saver.