As I mentioned before, we’re starting to utilize Boot-from-SAN as a means to strip the blades of their local disk. As the title says, after trying a manual installation of SLES 11.1 via CD/HTTP I wanted to automate the process, in order to get a reproducible, consistent installation method. As you might have figured, AutoYaST doesn’t have any built in support for configuring multipathing (hey, that’s what Novell says here). Now, they also provide a comprehensive how-to on how to “add” this to your AutoYaST, using a DUD (or Driver Update Disk).
Now, you can download the provided Driver Update Disk to any Linux box and unpack it using cpio. As the KB states, do the following:
|
1 2 3 4 |
cd /tmp/ gunzip multipath.DUD.gz cd /Installsource/SLES11SP1-x86_64/ cpio -i </tmp/multipath.DUD |
And you might get the same as I do:
|
1 2 3 4 5 6 7 8 9 10 11 12 13 14 15 16 |
chrischie:(sles-vm.home.barfoo.org) PWD:/srv/instsrc/sles/11.1/x64 Wed Feb 29, 21:13:42 [0] > sudo cpio -i < /tmp/multipath.DUD cpio: /NETSTORE/Installsource/SLES11SP1-x86_64/linux: Cannot mkdir: No such file or directory cpio: /NETSTORE/Installsource/SLES11SP1-x86_64/linux/suse: Cannot mkdir: No such file or directory cpio: /NETSTORE/Installsource/SLES11SP1-x86_64/linux/suse/x86_64-sles11: Cannot mkdir: No such file or directory cpio: /NETSTORE/Installsource/SLES11SP1-x86_64/linux/suse/x86_64-sles11/inst-sys: Cannot mkdir: No such file or directory cpio: /NETSTORE/Installsource/SLES11SP1-x86_64/linux/suse/x86_64-sles11/inst-sys/usr: Cannot mkdir: No such file or directory cpio: /NETSTORE/Installsource/SLES11SP1-x86_64/linux/suse/x86_64-sles11/inst-sys/usr/lib: Cannot mkdir: No such file or directory cpio: /NETSTORE/Installsource/SLES11SP1-x86_64/linux/suse/x86_64-sles11/inst-sys/usr/lib/YaST2: Cannot mkdir: No such file or directory cpio: /NETSTORE/Installsource/SLES11SP1-x86_64/linux/suse/x86_64-sles11/inst-sys/usr/lib/YaST2/startup: Cannot mkdir: No such file or directory cpio: /NETSTORE/Installsource/SLES11SP1-x86_64/linux/suse/x86_64-sles11/inst-sys/usr/lib/YaST2/startup/hooks: Cannot mkdir: No such file or directory cpio: /NETSTORE/Installsource/SLES11SP1-x86_64/linux/suse/x86_64-sles11/inst-sys/usr/lib/YaST2/startup/hooks/preFirstStage-old: Cannot mkdir: No such file or directory cpio: /NETSTORE/Installsource/SLES11SP1-x86_64/linux/suse/x86_64-sles11/inst-sys/usr/lib/YaST2/startup/hooks/preFirstStage-old/S01start_multipath.sh: Cannot open: No such file or directory cpio: /NETSTORE/Installsource/SLES11SP1-x86_64/linux/suse/x86_64-sles11/inst-sys/usr/lib/YaST2/startup/hooks/preFirstCall: Cannot mkdir: No such file or directory cpio: /NETSTORE/Installsource/SLES11SP1-x86_64/linux/suse/x86_64-sles11/inst-sys/usr/lib/YaST2/startup/hooks/preFirstCall/S01start_multipath.sh: Cannot open: No such file or directory 8 blocks |
Now, after creating the path in question (just mkdir -p /NETSTORE/Installsource/SLES11SP1-x86_64) and retrying the cpio, you’ll get the following:
|
1 2 3 |
chrischie:(sles-vm.home.barfoo.org) PWD:/srv/instsrc/sles/11.1/x64 Wed Feb 29, 21:15:44 [0] > sudo cpio -i < /tmp/multipath.DUD 8 blocks |
Next, according to the KB article is moving the linux directory to your actual install location (in my case /srv/instsrc/sles/11.1/x64) and then booting your system in question. And guess what you get ? Nil (as in the setup starts, but /sbin/multipath isn’t being called — which is nothing in my setup).
Next I tried copying the cpio-image (/tmp/multipath.DUD) to my install location as driverupdate (I know the SLES setup is pulling that file), which produced a warning about an unsigned driverupdate file (as it isn’t in ./content) — which can be circumvented by adding Insecure: 1 to your Info file (or passing insecure=1 as linuxrc parameter) — but after pressing “Yes” produced yet again Nil (still no call to /sbin/multipath).
After about three hours of fiddling with the original DUD (sadly the UCS blades are painfully slow to reboot — takes them about six minutes each), I decided to repack the Driver Update Disk. The Update Media HOWTO explains the structure/layout of the DUD pretty well, but fails to mention what kind of image it actually is or how to create it. Luckily there’s Google and the Internets.
The guys over at OPS East Blog, posted something that helped me create the DUD.
Basically, create /tmp/update-media and copy/move the linux folder into this folder.
|
1 2 3 |
mkdir /tmp/driver-update cp -r /NETSTORE/Installsource/SLES11SP1-x86_64/linux /tmp/update-media chown -R root.root /tmp/update-media |
After this, we create a Driver Update Disk configration.
|
1 2 3 4 |
echo "UpdateName: Enable multipathing config on AutoYaST boot" > /tmp/update-media/linux/suse/x86_64-sles11/dud.config echo "UpdateID: autoyast_multipath_1" >> /tmp/update-media/linux/suse/x86_64-sles11/dud.config |
Now, we create the DUD package.
|
1 |
mkfs.cramfs /tmp/update-media /tmp/driverupdate |
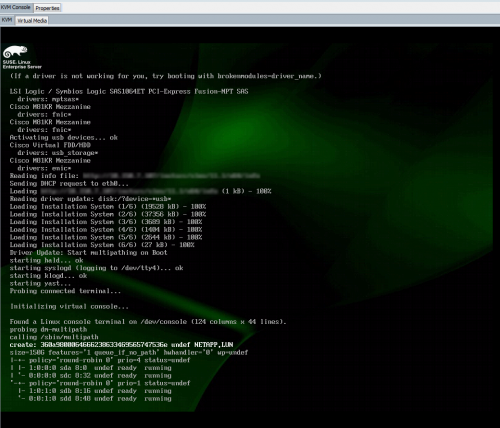
This produces a CramFS image named /tmp/driverupdate (which you can view using mount -o loop). After moving this image to my install location and keeping the filename driverupdate, /sbin/multipath is actually being called as you can see below.
